Shopify's default contact form has only few element...
Name, email address, phone number, contact content....
It only has 4 elements. And required field in lot less than that.
We have edited a bit of contact form style, but initial contact form that Shopify provide is more likely like this.

It might be fine if you are running pretty simple business. But if your business grows bigger, you might think that you want to add more fields in this contact form. It's completely natural to think that way.
Therefore, this time we are going to state the exact way to add new fields and also add required field in Shopify contact form.
The files you need to edit to change contact form
If you are using debut theme, the file you need to edit is page.contact.liquid file.

In order to get to this file, you need to go to admin → Online store → Theme → Live theme → Edit code → template folder → page.contact.liquid.

That page.contact.liquid is the file where you are going to edit.
(Although we are editing the Debut theme, the file name might differ according to your theme that you are editing.)
And specifically, the place you edit in page.contact.liquid is inside form tag.
 {% form 'contact', id: formId %}
 ・・・・・・・・・・・・・・・
 Lot of code in here
 ・・・・・・・・・・・・・・・
 {% endform %}
How to add new fields in Shopify contact form
And here is today's main topic.
This time, to above contact form, we are going to add
- Individual or Corporate button
- Website URL input text
to Shopify contact form.
Add radio button of Individual or Corporate
First, we will try to add new field of radio button to choose individual or corporate.
 <label>Individual・Corporate</label><br />
<input
 type="radio"
 id="ContactFormIndividual”
 name="contact[Individual・Corporate]”
 value=“Individual”
/>
Corporate<br />
<input
 type="radio"
 id="contactFormCorporate”
 name="contact[Individual・Corporate]”
 value=“Corporate”
/>
Corporate
That's the code.
If I explain it a bit、、、
 name="contact[field_name]"
 id="whatever_id_that_related_to_field"
 value="value_when_slected"
is the gyst.
Some design things has to be done, but we have succeeded to add button to the contact form.

Website URL input field
Next, we will create the text field so that if customer has website, they can include it in the contact submission.
It's the same place as radio button. Always inside form tag.
 <label for="ContactFormUrl">Website URL(Optional)</label>
<input
 type="text"
 id="ContactFormUrl"
 name="contact[URL]"
/>
Code to add Website URL input field is like above, and id, name are as it explained in previous fields.
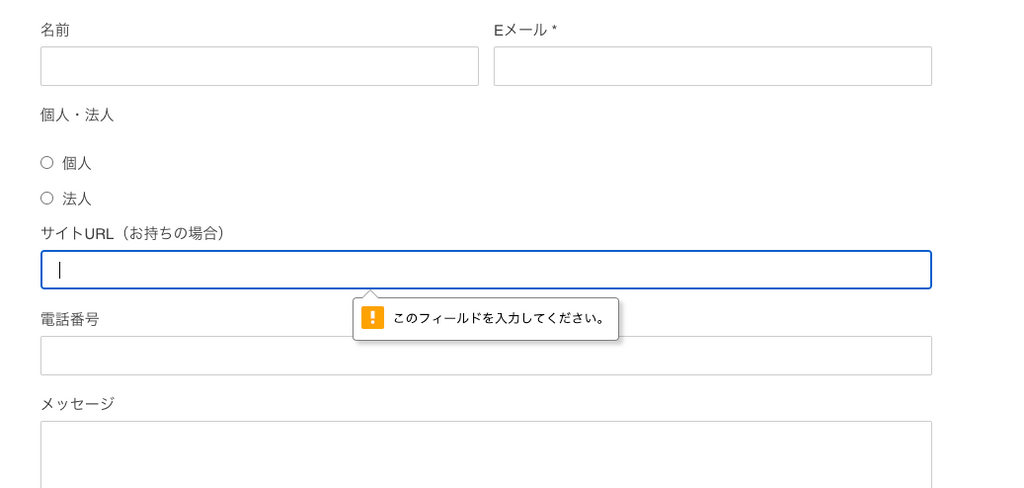
So if you add above code...

We have succeeded to add textbox input field!
To make contact form field as required
In addition to that we will end with "how to make contact fields required".
This is easier than above adding fields, so non engineers can also easily edit it.
For example, let's make Website URL field as required.
 <label for="ContactFormUrl">WebsiteURL(Required)</label>
<input
required
type="text"
id="ContactFormUrl"
name="contact[URL]"
/>
Did you notice the difference?
Inside <input>tag, we have added "required".
In this way, we have succeeded to add required field to the contact form.
If you try to submit with not inputting this required field...

[Shopify]Add new fields to contact form and make it required SUMMARY
That's all for today.
To add fields in the contact form, or to make those as required field. That seems less important, but it might make your work lot less and save time.
(If we don't have enough information from the customer, we have to communicate a lot to get all the information we need. It takes time and stressful for both store owner and customers.)
And our customer form is not that perfect yet, so we need to work on a bit more haha
Thank you for reading and have a great day!!
![[Shopify]コンタクトフォームに新項目を追加する、必須項目にする方法 - EC PENGUIN](http://ec-penguin.com/cdn/shop/articles/waterscape-5541692_1920_00633937-5851-48f3-89ea-ac0d6c1f7e81_1100x.jpg?v=1605354991)


![[React] About React Hooks.](http://ec-penguin.com/cdn/shop/articles/early-morning-7525151_1920_grande.jpg?v=1667630718)
![[React] About the lifecycle.](http://ec-penguin.com/cdn/shop/articles/deer-7508187_1280_grande.jpg?v=1667626423)
![[React] Basics of React.](http://ec-penguin.com/cdn/shop/articles/flowers-7144466_1920_grande.jpg?v=1667560185)
![I would absolutely love to have this in my [Shopify] store! Recommended](http://ec-penguin.com/cdn/shop/articles/milky-way-6657951_1280_grande.jpg?v=1633862228)
![[Shopify App] Make classy landing page free with PageFly NoCode](http://ec-penguin.com/cdn/shop/articles/plant-5643271_1280_grande.jpg?v=1605355173)
![[Shopify] Essential background paper sheets for individual e-commerce site product photography [3 recommendations]](http://ec-penguin.com/cdn/shop/articles/2021-06-15_22.21.38_grande.png?v=1623763402)
![[Shopify]Make Valentines Day LP (Landing page) free with nocode](http://ec-penguin.com/cdn/shop/articles/rose-3063283_1280_grande.jpg?v=1631631509)