![[Shopify] サイトにGoogle Analytics(アナリティクス)を導入・設定する方法 - EC PENGUIN](http://ec-penguin.com/cdn/shop/articles/peony-5420406_1920_5165e42a-178b-4940-b046-12c9b78fc03d_1100x.jpg?v=1605354904)
In this article, we will show you how to install and apply Google Analytics to your Shopify site. Although it is possible to analyze access to the Shopify site using the store analytics, I would prefer to use Google Analytics, which I am familiar with. So we decided to use Google Analytics.
The rough flow is as follows.
- Register an account with Google Analytics
- Obtain tracking code
- Embed it in your Shopify store
Sign up for Google Analytics
Create a Google account
If you do not have a Google account, create one here.
https://accounts.google.com/SignUp
If you have a Gmail account, you may use that.
Register with Google Analytics
Next, register with Google Analytics.
https://analytics.google.com/analytics/web/
The following information is required for Analytics registration for your reference.
- Tracking Target
The target for tracking is the "website" if it is a Shopify site.
- Account Name
You can use any name you like, such as your Shopify site name, company name, or store name.
- Website Name
This should be the name of your Shopify site. For my site, it would be EC PENGUIN.
- Website URL
Be sure to enter the correct URL for your website. It is the domain name.
https://ec-penguin.com最後のスラッシュはいらないのでお気をつけください.
- Type of Business
Choose a product that most closely matches the products you sell on your Shopify store, or if you have an e-commerce store type of business, that may be fine as well.
- Reporting time zone
Which time zone to use. If you are in Japan, choose Japan. Please note that if you select overseas, the day will not start at midnight Japan time.
- Data Sharing Settings
If there is a field that does not require data sharing, select it, but basically I think you can leave it as recommended.
You are now registered for Analytics.
Obtain an Analytics tracking code.
Next, obtain the Analytics tracking code.
Go to the Analytics administration page → gear symbol (Settings) at the bottom of the sidebar → Tracking Information → Tracking Code.
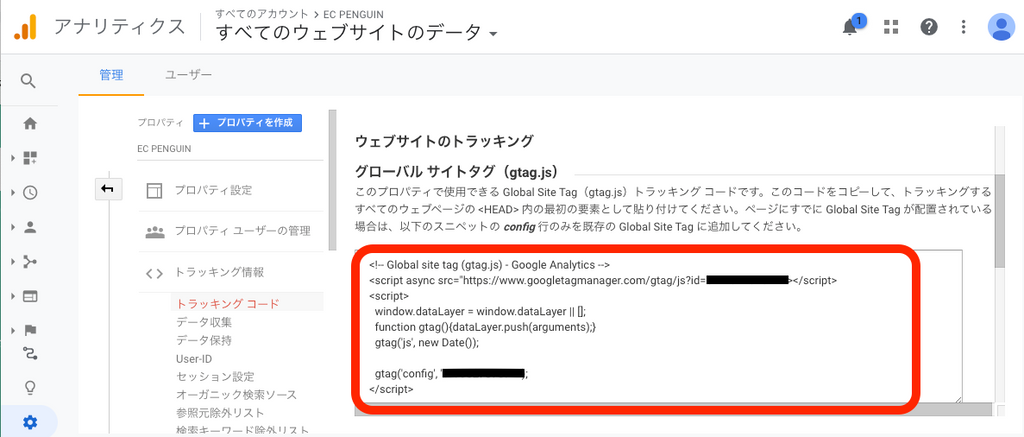
This <! - Global site tag and end with </script>. Do not close the tab.
Embed Analytics in your Shopify site
Next, let's embed the previous analytics code into the Shopify site.
Admin → Online Store → Various Settings → Google Analytics

Let's paste the tracking code mentioned earlier into this "Google Analytics Account" section. Now hit save and Google Analytics is applied! (By the way, please keep in mind that it may take up to a day for this to take effect.)
Using Analytics Extended E-Commerce

After saving, use extended e-commerce. There is a check box that says "Use extended e-commerce", so click on that as well.
By checking the "Extended E-commerce" checkbox, you will be able to retrieve e-commerce specific information such as number of purchases and revenue.
Don't forget to set this up on the Google Analytics side under "eCommerce Settings".

How to install and configure Google Analytics on your Shopify site Summary
This is how to embed Google Analytics on your Shopify site.
Now you can track your Shopify store traffic and user behavior! There should be many hidden hints to increase sales, such as where visitors came to the site from and at what time of the day they are most likely to visit.
Making hypotheses and verifying them is also a fun part of site management ☺️.
Google Analytics also has a dedicated application that can be viewed from cell phones, making it possible to check access when you wake up in the morning.
Thank you for reading to the end!
Have a great day!


![[React] About React Hooks.](http://ec-penguin.com/cdn/shop/articles/early-morning-7525151_1920_grande.jpg?v=1667630718)
![I would absolutely love to have this in my [Shopify] store! Recommended](http://ec-penguin.com/cdn/shop/articles/milky-way-6657951_1280_grande.jpg?v=1633862228)
![[Shopify App] Make classy landing page free with PageFly NoCode](http://ec-penguin.com/cdn/shop/articles/plant-5643271_1280_grande.jpg?v=1605355173)
![[Shopify] Essential background paper sheets for individual e-commerce site product photography [3 recommendations]](http://ec-penguin.com/cdn/shop/articles/2021-06-15_22.21.38_grande.png?v=1623763402)
![[Shopify]Make Valentines Day LP (Landing page) free with nocode](http://ec-penguin.com/cdn/shop/articles/rose-3063283_1280_grande.jpg?v=1631631509)